Migrating from Defender to Open Source
Overview
Defender is now in maintenance mode. To continue using monitoring and relaying capabilities with the latest features and updates, we recommend migrating to OpenZeppelin's open source tools.
This guide covers:
- Migrating from Defender Monitor to OpenZeppelin Monitor
- Migrating from Defender Relayer to OpenZeppelin Relayer
Both tools are designed to be self-hosted, giving you full control over your infrastructure while maintaining the functionality you rely on.
Migration Strategy
Planning Your Migration
- Review your current usage: Identify which Defender modules you're actively using
- Export configurations: Use Defender UI to export Monitors and Relayers configuration
- Set up infrastructure: Configure the open source tools on your own infrastructure
- Test thoroughly: Run both systems in parallel during the transition period
- Migrate traffic gradually: Switch over when you're confident everything works correctly
Timeline Considerations
- Plan for adequate testing time before fully switching over
- Consider running both systems in parallel during migration
- Schedule migration during low-traffic periods if possible
Monitor Migration
From Defender Monitor to OpenZeppelin Monitor
OpenZeppelin Monitor offers similar functionality to Defender Monitor:
- Event and function monitoring: Monitor smart contract events and function calls
- Custom filtering: Write custom JavaScript, Python or Bash filters to match specific conditions
- Multiple notification channels: Integrate with Slack, Telegram, Discord, webhooks and emails
Getting Started
To begin your Monitor migration:
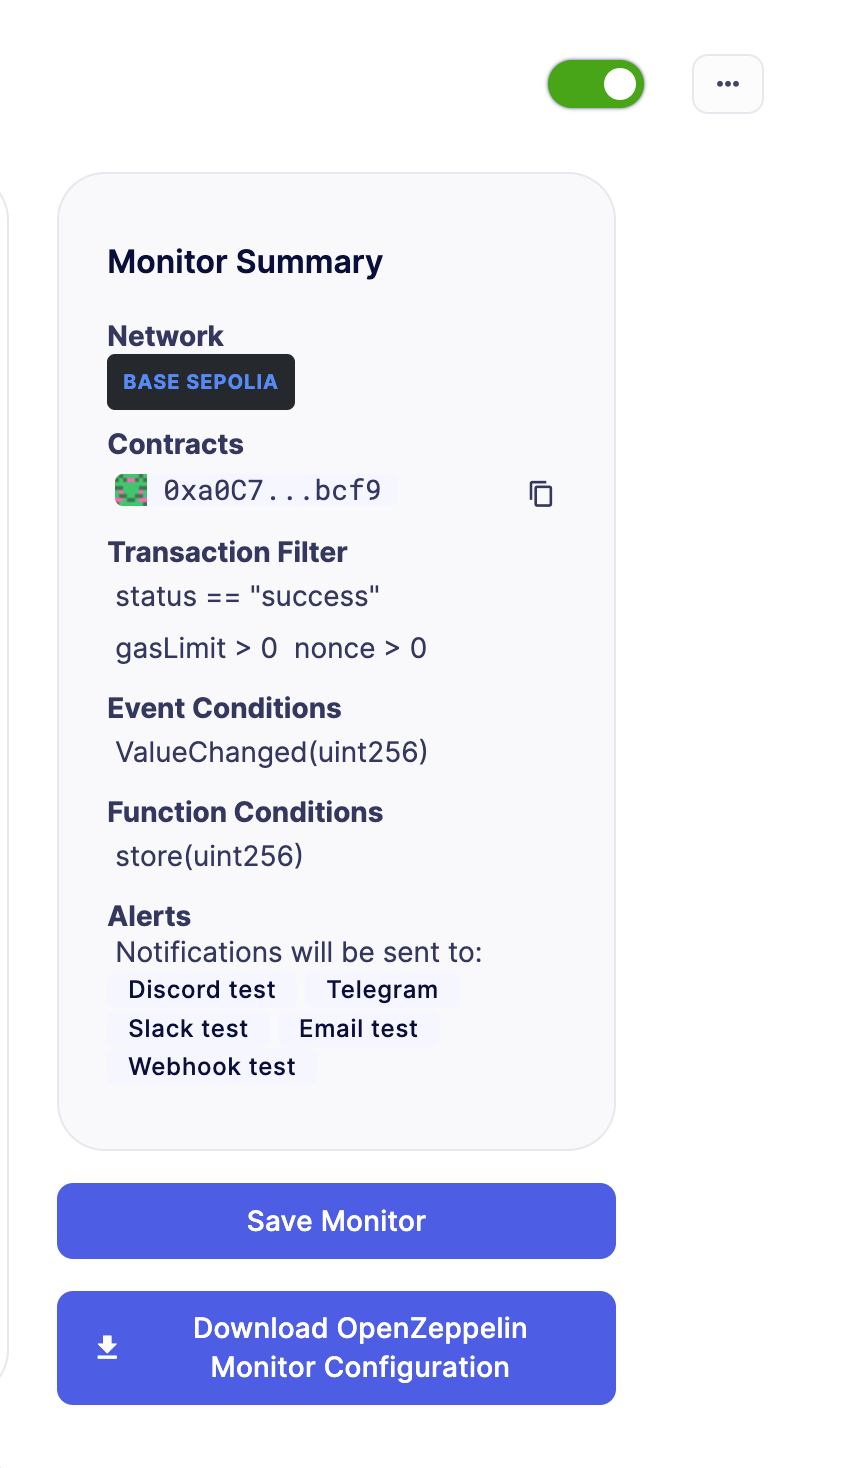
- Review your existing monitors: Export your Defender Monitor configurations using the "Download OpenZeppelin Monitor Configurations" button
- Import your configurations: Use the exported configurations to recreate your monitors in OpenZeppelin Monitor
- Set up OpenZeppelin Monitor: Follow the installation guide to set up the Monitor.

The "OpenZeppelin Monitor Configurations" button will download a .zip file containing configuration files for every monitor in your Defender account (If for any reason you don't want a specific monitor to be migrated, we recommend you delete the monitor before clicking on the OpenZeppelin Monitor Configurations button ). These configurations are ready to copy and paste directly into OpenZeppelin Monitor. Before running the monitors, make sure to review and update any placeholder values in the configuration files, such as:
- API keys and secrets
- RPC URLs and endpoint addresses
- Webhook URLs for notifications
- Service integration credentials (Slack, Telegram, Discord, etc.)
Custom Actions attached to your Defender monitors will not be automatically migrated. You will need to manually recreate any custom action logic following the OpenZeppelin Monitor documentation for trigger handlers and custom notifications.
Alternatively, if you don't want to download all the monitors configurations at once, you can navigate to each individual monitor and download its configuration separately. This gives you more control over which monitors to migrate and when.
Here's a video with the process step by step: https://www.loom.com/share/6de3d269f92c4df6abe951af69c64feb
- Test your monitors: Verify that alerts trigger correctly before decommissioning Defender monitors
For detailed migration instructions and support, visit the OpenZeppelin Monitor documentation.
Relayer Migration
From Defender Relayer to OpenZeppelin Relayer
OpenZeppelin Relayer is an open-source transaction relaying service that provides secure, reliable transaction submission to blockchain networks. With Defender shutting down on July 1, 2026, migrating to OpenZeppelin Relayer ensures continuity of your relaying infrastructure while giving you full control over your deployment.
OpenZeppelin Relayer offers similar functionality to Defender Relayer:
- Transaction relaying: Submit transactions to supported blockchain networks efficiently
- Transaction signing: Securely sign transactions using configurable key management
- Nonce management: Handle nonce management to ensure transaction order
- Gas pricing: Automatic gas price estimation and configuration
- Multi-chain support: Interact with EVM, Solana, and Stellar networks
- SDK integration: Easily interact with the relayer through a companion JavaScript/TypeScript SDK
- Configurable policies: Define and enforce network-specific policies for transaction processing
Getting Started
Follow these steps to migrate your Defender Relayers to OpenZeppelin Relayer:
Step 1: Download Configuration from Defender
Export your Defender Relayer configurations using the "OpenZeppelin Relayer Configurations" button in the Defender UI.

If you don't want a specific relayer to be migrated, delete that relayer before clicking the download button.
What you'll download:
A ZIP file containing:
config.json- Your relayer configurationsnetworks/folder - Custom network definitions (if you have relayers on forked or private networks)
Step 2: Set Up OpenZeppelin Relayer
Before importing your configurations, set up the OpenZeppelin Relayer infrastructure by following the OpenZeppelin Relayer Quick Start Guide.
Step 3: Place Configuration Files
- Extract the downloaded ZIP file
- Copy
config.jsonto theconfig/directory in your OpenZeppelin Relayer project - If you have custom networks, copy the
networks/folder contents toconfig/networks/
Your directory structure should look like:
openzeppelin-relayer/
├── config/
│   ├── config.json
│   └── networks/           # Only if you had forked/private networks
│       ├── my-network.json
│       └── ...
Step 4: Adjust Configuration
After placing the files, you need to update several configuration values:
For custom networks:
If you have forked or private networks, update the RPC URLs in each network definition file under config/networks/. Replace placeholder values with your actual RPC endpoint URLs:
{
  "network": "my-custom-network",
  "rpc_urls": ["https://your-rpc-endpoint.com"]
}
For all relayers:
Edit config/config.json to update:
-
Signer configuration: Each relayer needs a signer configured. See Choosing a Signer Type below for options and setup instructions.
-
Notification webhooks: Update the
notificationssection with your webhook URLs:
"notifications": [
  {
    "id": "my-webhook",
    "type": "webhook",
    "url": "https://your-webhook-endpoint.com/notifications",
    "signing_key": {
      "type": "env",
      "value": "WEBHOOK_SIGNING_KEY"
    }
  }
]- Network-specific policies: Review and adjust policies for each relayer as needed (gas price caps, minimum balance thresholds, whitelist receivers, etc.).
For detailed configuration options, see the OpenZeppelin Relayer Configuration documentation.
Step 5: Verify OpenZeppelin Relayer Works
After configuring, start the relayer and verify it's working correctly:
-
Start the relayer using one of the methods described in the Quick Start Guide (either running locally with Cargo or using Docker Compose).
-
Check the startup logs for any configuration errors or warnings.
-
Test the API endpoints to verify your relayers are configured correctly:
# Get relayer details
curl -X GET http://localhost:8080/api/v1/relayers/{relayer_id} \
  -H "Content-Type: application/json" \
  -H "Authorization: Bearer YOUR_API_KEY"

# Check relayer balance
curl -X GET http://localhost:8080/api/v1/relayers/{relayer_id}/balance \
  -H "Content-Type: application/json" \
  -H "Authorization: Bearer YOUR_API_KEY"
Replace {relayer_id} with your relayer's ID and YOUR_API_KEY with the API key from your .env file.
A successful response confirms your relayer is properly configured and connected to the network.
Step 6: Transfer Funds
Once OpenZeppelin Relayer is running correctly:
- Go to Defender Relayers in the Defender UI
- Select the relayer you want to migrate
- Go to settings
- Click the Withdraw button

- Recommended: Transfer a small amount first and test with a transaction
- If the test transaction succeeds, transfer the remaining funds
Since you're creating new relayer addresses (see Understanding Signer Migration), make sure to update any smart contract permissions, whitelists, or access control lists to include the new addresses before transferring all funds.
Step 7: Gradually Move Traffic
After successful testing:
- Run both Defender and OpenZeppelin Relayer in parallel
- Shift traffic incrementally from Defender to OpenZeppelin Relayer
- Monitor for any issues
- Once confident, fully switch over to OpenZeppelin Relayer
Here's a video with the process step by step: https://www.loom.com/share/cb5e0f5d8c064a71abc8c18fac273cf0
Understanding Signer Migration
Relayer recreation is required due to AWS KMS security constraints
Defender Relayers use AWS Key Management Service (AWS KMS) to secure private keys. Due to AWS KMS's security model, private keys cannot be exported outside AWS. This means:
- You cannot export existing Defender Relayer private keys
- You cannot import Defender Relayer keys into OpenZeppelin Relayer
- You must create new relayers with new addresses when migrating to OpenZeppelin Relayer
This is a fundamental security feature of AWS KMS that protects your keys from unauthorized access.
Choosing a Signer Type
OpenZeppelin Relayer supports multiple signer types to accommodate different security requirements and infrastructure setups. Each relayer must be configured with a signer that manages the private key for transaction signing.
Available Signer Options
| Signer Type | Description |
|---|---|
| Local | Encrypted keystore file stored on the filesystem |
| AWS KMS | Amazon Web Services Key Management Service |
| Google Cloud KMS | Google Cloud Key Management Service |
| HashiCorp Vault | Vault secret engine for private key storage |
| HashiCorp Vault Transit | Vault Transit encryption engine |
| Turnkey | Third-party key management service |
| Coinbase Developer Platform (CDP) | Coinbase's managed key solution |
Migration Steps for Signers
- Select a signer type that matches your security and infrastructure requirements
- Generate new keys using your chosen signer service (refer to the Signer Configuration documentation for detailed setup instructions)
- Configure your relayers to use the new signers in your OpenZeppelin Relayer configuration
- Update smart contract permissions: Since you'll have new addresses, update any:
- Access control lists
- Whitelist entries
- Role assignments
- Trusted forwarder configurations
- Transfer funds from old Defender Relayer addresses to new OpenZeppelin Relayer addresses
- Test thoroughly before switching production traffic
For detailed configuration instructions for each signer type, see the OpenZeppelin Relayer Signer Configuration documentation.
SDK Migration
If you are using the Defender SDK (@openzeppelin/defender-sdk) to interact with Defender Relayers programmatically, you will need to migrate to the OpenZeppelin Relayer SDK (@openzeppelin/relayer-sdk).
Installation
Replace the Defender SDK with the OpenZeppelin Relayer SDK:
# Remove Defender SDK
npm uninstall @openzeppelin/defender-sdk @openzeppelin/defender-sdk-relay-client @openzeppelin/defender-sdk-relay-signer-client

# Install OpenZeppelin Relayer SDK
npm install @openzeppelin/relayer-sdk
Code Migration Examples
Sending a Transaction
Before (Defender SDK):
const { Defender } = require("@openzeppelin/defender-sdk");
const client = new Defender({
  relayerApiKey: "YOUR_API_KEY",
  relayerApiSecret: "YOUR_API_SECRET",
});

const tx = await client.relaySigner.sendTransaction({
  to: "0x...",
  value: "1000000000000000000",
  data: "0x",
  gasLimit: 21000,
  speed: "fast",
});
After (OpenZeppelin Relayer SDK):
import { RelayerApi, Configuration } from "@openzeppelin/relayer-sdk";

const config = new Configuration({
  basePath: "http://localhost:8080/api/v1",
  accessToken: "YOUR_API_KEY",
});

const relayerApi = new RelayerApi(config);

const tx = await relayerApi.sendTransaction("your-relayer-id", {
  to: "0x...",
  value: "1000000000000000000",
  data: "0x",
  gas_limit: 21000,
  speed: "fast",
});
Getting Transaction Status
Before (Defender SDK):
import { Relayer } from "@openzeppelin/defender-sdk-relay-signer-client";
const relayer = new Relayer({ apiKey: API_KEY, apiSecret: API_SECRET });
const tx = await relayer.getTransaction(transactionId);
After (OpenZeppelin Relayer SDK):
import { RelayerApi, Configuration } from "@openzeppelin/relayer-sdk";

const config = new Configuration({
  basePath: "http://localhost:8080/api/v1",
  accessToken: "YOUR_API_KEY",
});

const relayerApi = new RelayerApi(config);
const tx = await relayerApi.getTransactionById(
  "your-relayer-id",
  transactionId
);
Listing Relayers
Before (Defender SDK):
const { Defender } = require("@openzeppelin/defender-sdk");
const client = new Defender({
  apiKey: "YOUR_API_KEY",
  apiSecret: "YOUR_API_SECRET",
});

const relayers = await client.relay.list();
After (OpenZeppelin Relayer SDK):
import { RelayerApi, Configuration } from "@openzeppelin/relayer-sdk";

const config = new Configuration({
  basePath: "http://localhost:8080/api/v1",
  accessToken: "YOUR_API_KEY",
});

const relayerApi = new RelayerApi(config);
const relayers = await relayerApi.listRelayers();
API Method Mapping
| Defender SDK Method | OpenZeppelin Relayer SDK Method |
|---|---|
client.relaySigner.sendTransaction() | relayerApi.sendTransaction() |
relayer.getTransaction() | relayerApi.getTransactionById() |
relayer.list() | relayerApi.listTransactions() |
relayer.replaceTransactionById() | relayerApi.replaceTransaction() |
relayer.cancelTransactionById() | relayerApi.cancelTransaction() |
relayer.sign() | relayerApi.sign() |
relayer.signTypedData() | relayerApi.signTypedData() |
relayer.getRelayer() | relayerApi.getRelayer() |
relayer.getRelayerStatus() | relayerApi.getRelayerStatus() |
For detailed migration instructions and support, visit the OpenZeppelin Relayer documentation.
Support and Resources
Documentation
Getting Help
If you encounter issues during migration or have questions:
- Review the respective documentation for each tool
- Check GitHub repositories for issues and discussions
- Reach out to the OpenZeppelin community
Migration Checklist
Use this checklist to track your migration progress:
Monitor Migration
- Export Monitor configurations from Defender
- Review and update placeholder values (API keys, RPC URLs, etc.)
- Set up OpenZeppelin Monitor infrastructure
- Import and configure monitors
- Recreate custom action logic
- Test alert triggers
- Run in parallel with Defender Monitor
- Switch over and decommission Defender monitors
Relayer Migration
- Export Relayer configurations from Defender
- Review and update placeholder values (signers, RPC URLs, policies)
- Set up OpenZeppelin Relayer infrastructure
- Import and configure relayers
- Update SDK integration code (if applicable)
- Test transaction processing
- Run in parallel with Defender Relayers
- Transfer funds from Defender Relayers
- Gradually move traffic to OpenZeppelin Relayers
- Decommission Defender Relayers